Customizing the Login Form
The Login Form is your gateway to using and configuring the WordPress publishing platform. It controls access to the Administration Screens, allowing only registered users to login.
Contents
How to Login
If you installed WordPress in your website's root directory, your login page is:
http://example.com/wp-login.php
If you installed WordPress in its own subdirectory, e.g., /directory, your login page is:
http://example.com/directory/wp-login.php
If you have a problem logging in, try the Login Trouble suggestions.
The Login Form
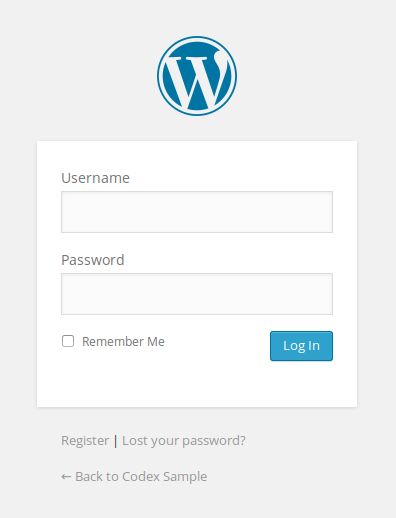
At the top of login page is the WordPress logo and link, followed by the login form, with:
- Input fields for "Username" and "Password."
- A "Remember Me" checkbox. If checked your browser keeps you logged in for 14 days. (If unchecked you're logged out when you quit the browser, or after two days.)
- The "Log In" button for submitting the form data.
Below the form are two links: One is for registered users who've forgotten their password. The other goes to the front page of your WordPress site.
This one login form can do three things:
- Log into a site (by filling in a valid Username and Password).
- Email a password to a registered user (by clicking the Lost your password? (link: wp-login.php?action=lostpassword).
- Register new users (who've arrived at this form by clicking a Register (link: wp-login.php?action=register).
Customizing the WordPress Login
Much of WordPress login page can be easily changed with WordPress Plugins (search for "login"). It can also be changed by manually adding code to the WordPress Theme's functions.php file.
Change the Login Logo
To change the WordPress logo to your own, you will need to change the CSS styles associated with this heading:
<h1 role="presentation" class="wp-login-logo"><a href="https://wordpress.org/">Powered by WordPress</a></h1>
WordPress uses CSS to display a background image -- the WordPress logo -- in the link (<a>) inside the heading tag (<h1>). You can use the login_enqueue_scripts hook to insert CSS into the head of the login page so your logo loads instead. To use the code below, replace the file named site-login-logo.png with the file-name of your logo, and store your logo with your active Theme files in a directory named /images:
function my_login_logo() { ?>
    <style type="text/css">
        #login h1 a {
            background-image: url(<?php echo get_stylesheet_directory_uri(); ?>/images/site-login-logo.png);
		height: 65px;
		width: 320px;
		background-size: 320px 65px;
		background-repeat: no-repeat;
        	padding-bottom: 30px;
        }
    </style>
<?php }
add_action( 'login_enqueue_scripts', 'my_login_logo' );
The size of your logo should be no bigger than 80 x 80 pixels (though even this can change with custom CSS). Adjust the above padding-bottom value to the spacing you want between your logo and the login form.
To change the link values so the logo links to your WordPress site, use the following WordPress hooks example; edit it and paste it below the previous in the functions.php:
function my_login_logo_url() {
    return home_url();
}
add_filter( 'login_headerurl', 'my_login_logo_url' );

function my_login_logo_url_title() {
    return 'Your Site Name and Info';
}
add_filter( 'login_headertext', 'my_login_logo_url_title' );
Styling Your Login
You can style every HTML element on the WordPress login page with CSS. To add styles to the <head> of your login page, use a function like the above my_login_logo. Styles declared within the head element of a page are called an "embedded style sheet" and take precedence over styles in linked external style sheets.
If you have a lot of login page styles, you may want to make your own custom login style sheet. This code, added to your functions.php file, would load a CSS file named style-login.css, stored with your active Theme files:
function my_login_stylesheet() {
    wp_enqueue_style( 'custom-login', get_stylesheet_directory_uri() . '/style-login.css' );
    wp_enqueue_script( 'custom-login', get_stylesheet_directory_uri() . '/style-login.js' );
}
add_action( 'login_enqueue_scripts', 'my_login_stylesheet' );
WordPress links two of its own external style sheets to the login page: wp-admin/css/colors.css and wp-admin/css/wp-admin.css (since Version 3.8, previous versions used wp-admin/css/color/color-fresh.css, wp-admin/css/login.css). You can override the WordPress default styles by making your style declaration more "specific" -- when two styles apply to the same element, CSS gives precedence to the more specific selector.
Here's some helpful, highly specifc CSS selectors for the login page:
body.login {}
body.login div#login {}
body.login div#login h1 {}
body.login div#login h1 a {}
body.login div#login form#loginform {}
body.login div#login form#loginform p {}
body.login div#login form#loginform p label {}
body.login div#login form#loginform input {}
body.login div#login form#loginform input#user_login {}
body.login div#login form#loginform input#user_pass {}
body.login div#login form#loginform p.forgetmenot {}
body.login div#login form#loginform p.forgetmenot input#rememberme {}
body.login div#login form#loginform p.submit {}
body.login div#login form#loginform p.submit input#wp-submit {}
body.login div#login p#nav {}
body.login div#login p#nav a {}
body.login div#login p#backtoblog {}
body.login div#login p#backtoblog a {}
WordPress uses the CSS style sheet wp-admin.css to insert the logo and to hide the heading text with text-indent:-9999px;:
.login h1 a {
	background-image: url('../images/w-logo-blue.png?ver=20131202');
	background-image: none, url('../images/wordpress-logo.svg?ver=20131107');
	background-size: 80px 80px;
	background-position: center top;
	background-repeat: no-repeat;
	color: #999;
	height: 80px;
	font-size: 20px;
	font-weight: normal;
	line-height: 1.3em;
	margin: 0 auto 25px;
	padding: 0;
	text-decoration: none;
	width: 80px;
	text-indent: -9999px;
	outline: none;
	overflow: hidden;
	display: block;
}
Using a more specific selector in your custom style sheet overrides the above background-image value, inserting your logo instead:
body.login div#login h1 a {
    background-image: url("images/site-logo.png");
}
The default login page style in colors.css sets the text color of the links below the form:
.login #nav a,
.login #backtoblog a {
	text-decoration: none;
	color: #999;
}
To override that, increase the specificity and include !important:
body.login div#login p#nav a,
body.login div#login p#backtoblog a {
    color: #0c0 !important; /* Your link color. */
}
Login Hooks
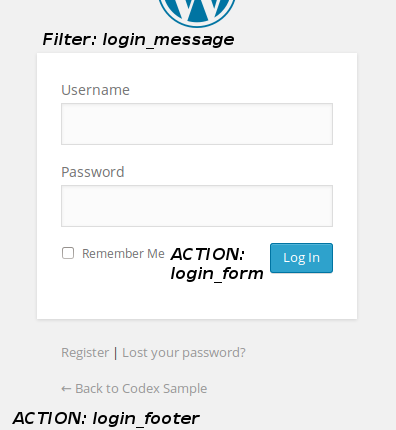
You can customize your WordPress login page with action hooks and filter hooks, including:- Actions in the <head> of the document: login_enqueue_scripts, login_head.
- Filters in the <body>: login_headerurl, login_headertitle, login_message, login_errors.
- Actions at the bottom of and below the form: login_form, login_footer.
The image to the right shows where several of the hooks can add content.
The above hooks run when using the form to login. Others are meant for registration, password retrieval, and WordPress Plugins.
The WordPress file wp-login.php generates the HTML, containing the location and sequence of all the login page hooks.
Make a Custom Login Page
So far you've seen how to customize WordPress' built-in login page. You can also create your own custom login Page by using the wp_login_form function in one of your WordPress Theme's Page Templates:
<?php wp_login_form(); ?>
The function has several parameters to change the default settings. For instance, you can specify: the ID names of the form and its elements (for CSS styling), whether to print the "Remember Me" checkbox, and the URL a user is redirected to after a successful login (default is to stay on the same Page):
<?php
if ( ! is_user_logged_in() ) { // Display WordPress login form:
    $args = array(
        'redirect' => admin_url(),
        'form_id' => 'loginform-custom',
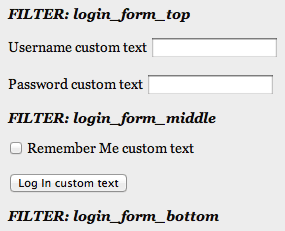
        'label_username' => __( 'Username custom text' ),
        'label_password' => __( 'Password custom text' ),
        'label_remember' => __( 'Remember Me custom text' ),
        'label_log_in' => __( 'Log In custom text' ),
        'remember' => true
    );
    wp_login_form( $args );
} else { // If logged in:
    wp_loginout( home_url() ); // Display "Log Out" link.
    echo " | ";
    wp_register('', ''); // Display "Site Admin" link.
}
?>
The above function parameters:
- Redirect the user to the Administration Dashboard Screen after login.
- Set the ID name for the form: id="loginform-custom".
- Change the text labels for the form elements (e.g., from the default "Username" to, in this example, "Username custom text").
- Print the "Rememeber Me" checkbox.
If the user is already logged in, the form does not print; instead they see two links: Log Out | Site Admin.
This login form has the filters: login_form_top, login_form_middle, and login_form_bottom. Each can print text in the form, as shown in the image on the right.
The form itself is generated by code in the WordPress wp-includes/general-template.php file. Because your custom login Page is different than the built-in WordPress login page (wp-login.php), the same CSS stylesheets do not apply. But your active Theme's stylesheet (style.css) does apply, so use that to style this form.
Other template tags related to login functionality include wp_login_url, wp_logout_url, wp_loginout, wp_lostpassword_url, login_redirect, and wp_register.
Resources
Related
Login Tags:
is_user_logged_in(),
wp_login_form(),
wp_loginout(),
wp_logout(),
wp_register()
Login URLs:
wp_login_url(),
wp_logout_url(),
wp_lostpassword_url(),
wp_registration_url()


