User:Cordulack/Revision of WordPress Menu User Guide
Many WordPress Themes allow you to easily customize your site’s navigation menus. Depending on your Theme, you can create multiple navigation menus and place them in different parts of your site. For example, the Twenty Eleven Theme allows you to customize the horizontal navigation menu at the top of your site and you can add custom navigation menus to your sidebars and footer by using the Custom Menus widget.
Unfortunately, not all WordPress Themes allow you to customize navigation menus. To find out if your activated Theme has this feature, look for Appearance > Menus when logged into your site. If it doesn't exist, then your Theme most likely does not support custom navigation menus. If does exist, click through and look in the "Theme Locations" box. If it tells you that "This Theme does not natively support menus," then you can only use custom navigation menus through the Custom Menu Widget.
Contents
Creating a Menu
WordPress makes it easy to create a menu for your site's main navigation (if supported) or the Custom Menu widget.
- Log in to your site and navigate to Appearance > Menus.
- Enter a name for your new menu in the Menu Name box then click the Create Menu button.
Adding Items to a Menu
To add items to your menu:
- Find the item you wish to add on the left side of the screen and click the checkbox next to it.
- Click "Add to Menu"
- Click "Save Menu"
Certain items, like Posts are hidden by default. Click on Screen Options in the upper-right corner of your screen to select which types of items you wish to see in the Appearance > Menus screen.
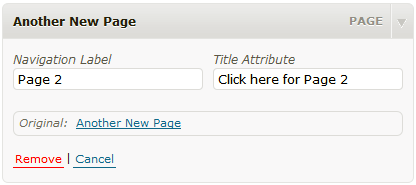
To delete an item from your menu, click on the arrow icon in the top right-hand corner of the menu item. The menu item box should expand and reveal the options you can edit and a "Remove" link.
- Click on the "Remove" link in the bottom left-hand corner. The menu item box for the menu item you deleted should no longer be displayed.
- Click the Save Menu button to save your changes.
Once you have added an item to your menu, you can change its label (the word that your vistors on your menu). You can also change the "Title Attribute" (the text that will show in the alt attribute in your menu's HTML allowing screen readers to interpret your menu).
To change your a Menu Item's Navigation Label or Title Attribute:
- Left-click on the arrow in the top right-hand corner of the menu item box. The menu item box should then expand to show the menu item's options.
- Enter the values for the Navigation Label and Title Attribute that you want to assign to the menu item and then click the Save Menu button to save the changes. In the menu editor, the title for the menu item you edited should be updated.
Organizing Your Menu
The WordPress menu editor allows you to create multi-level menus using a simple "drag and drop" interface. You can drag menu items up and down to change their order of appearance in the menu, or you can drag them left or right in order to create a multi-level menu structure.
Activating Your New Menu
To show your new menu on your site, select the name of your menu in the appropriate drop-down box under "Theme Locations" and click "Save".

