Interested in functions, hooks, classes, or methods? Check out the new WordPress Code Reference!
User:Priceofsalt/Uploading Files
Contents
Uploading Files
After you login to WordPress and click on your Dashboard, you can upload files.
With WordPress, you have the following options:- You can upload files immediately in a post.
- You can upload files immediately in a page.
- You can upload files to your Media Library and store them for later use.
- jpg
- jpeg
- png
- gif
- doc
- ppt
- odt
- pptx
- docx
- pps
- ppsx
- xls
- xlsx
To Upload a File for Later Use
- On the Dashboard menu, click Media and then click Add New to display the "Upload New Media" page.
- Click the Select Files button to open a dialog box.
- In the dialog box, select the file you want to upload.
To select multiple files, hold down the SHIFT key (for PC users) or the COMMAND key (for Macintosh users). - Click the Open button.
- When the upload is complete, a field with your file details appears. Below the field, click Save all changes.
Note: If the file does not open, then the file type is not supported, the chosen format may not match the file’s true format or the file may be damaged.
To Upload a File in a Post
- On the Dashboard menu, click Posts and then click Add New to view the "Add New Post" page.
- On the Upload/Insert menu, click the icon that represents the type of file you want to upload.
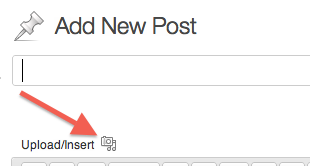
The "Add media files from your computer" window appears. - Click the Select Files button.
- In the dialog box, select the file you want to upload.
To select multiple files, hold down the SHIFT key (for PC users) or the COMMAND key (for Macintosh users). - Click Open.
- When your file uploads, a field appears. At the bottom of the field click Insert into Post.

Note: If you are having problems uploading files with the default Flash uploader, you may want to use the Browser Uploader instead.
To Upload a File in a Page
- On the Dashboard menu, click Pages, and then click Add New to display the "Add New Page" page.
- On the Upload/Insert menu, select the icon that represents the type of file you want to upload.
The "Add media files from your computer" window appears. - Click on the Select Files button to open a dialog box.
- In the dialog box, select the file you want to upload.
To select multiple files, hold down the SHIFT key (for PC users) or the COMMAND key (for Macintosh users). - Click the Open button.
- When the upload is complete, a field with your file appears. At the bottom of the field, click the Insert into Post button.
To Upload a File with the Browser Uploader
- To upload a file for later use: on the Dashboard menu, click Media, and then click Add New to display the "Upload New Media" page.
-Or-
To upload a file in a page: on the Dashboard menu, click Pages, click Add New to display "Add New Page," and then, on the Upload/Insert menu, click the icon that represents the type of file you want to upload.
-Or-
To upload a file in a post: on the Dashboard menu, click Posts, click Add New to view the "Add New Post" page, and then, on the Upload/Insert menu, click the icon that represents the type of file you want to upload. - Below the Select Files button, click the link to “Browser uploader."
- When the Browser uploader appears, click the Choose File button to display a dialog box.
- In the dialog box, select the file you want to upload.
To select multiple files, hold down the SHIFT key (for PC users) or the COMMAND key (for Macintosh users). - Click the Upload button.

Resources
Using Images
Using Image and File Attachments
Inserting Images into Posts and Pages
Media Library Screen