zh-cn:创建站点网络
Languages: English • A Network 日本語 Русский • 中文(简体) • (Add your language)
在WordPress 3.0版本中,已经开始提供了创建一个多站点博客网络的功能。此文是关于如何创建这么一个网络的说明,最终就像创建了一个你的个人版WordPress.com博客网站一样.
Contents
准备步骤
需要Admin管理权限
如果想配置多站点博客网络,你至少应该对UNIX、Linux的管理操作有基本了解。最好能对WordPress开发、PHP、HTML 和 CSS 有一定认识.
配置安装并运行起来一个多站点博客网络比单博客站点要明显复杂。阅读本文会有利于你确定是否真正需要假设一个多站点博客网络,且告诉你如果必须这么做时会涉及到些什么。如果这些本文的指导你不是真正明白的话,请务必首先在测试站点做这些动作,请谨慎在一个正在正常运作的站点上操作.
服务器需求
由于该功能需要对服务器进行另外的设置并且需要了解更多的技术细节,请联系你的网络服务商以便确认他们的服务是否支持这些特性。不推荐在共享的服务器上进行这样的操作。
当执行第四步时,你需要在子域名和子目录之间做一个选择,这意味着网站中其它的子域名或子目录可能要进行一些更改。
- 子域名:例如
site1.example.com和site2.example.com - 子目录:例如
example.com/site1和example.com/site2
- 子域名:例如
稍后也可以, 使用插件WordPress MU Domain Mapping, to map individual sites to independent domain names.
- 子目录网站
- 它的工作原理是使用 服务器上mod_rewrite的功能 需有能力阅读
.htaccess文档, 该功能将提供创建链接结构. - 如果你已经在你的博客上使用了固定链接, 那么子目录就会正常运行.
- 子域名网站
- 它的工作原理是使用通配符子域(即'*'). 您必须在Apache中开启此功能, 您还必须在DNS记录里添加通配符子域. (参见Step 2 如何配置.)
- 有些主机已经设置了通配符在服务器端,这意味着您只需要添加DNS记录。
- 一些共享的主机商可能不支持这个,所以您可能需要启用此功能前,请检查您的虚拟主机提供商。
WordPress 必要的设置
- Giving WordPress its own directory 不能开启WordPress 3.0多站点. 它会干扰查询博客成员.
- 如下列的情况,那你不能创建一个站点网络 :
- "WordPress地址 (URL)" 不等同于 "网站地址(URL)".
- "WordPress地址(URL)" 使用数字端口':80', ':443'.
- 如下列的情况,你不能选择 子域 安装:
- WordPress安装在一个目录(文件夹)里(不是根目录).
- "WordPress地址(URL)" 是
localhost(即本地环境). - "WordPress地址(URL)" 是IP地址,如127.0.0.1.
- 如下列的情况,你不能选择子目录 安装:
- 如果你现在的WordPress已经使用了一个多月,创建站点网络与现在的固定链接会产生问题, (在未来的版本这个问题会得到解决. 参见 Switching between subdomains and subfolders 获得更多信息.)
(参见 wp-admin/network.php获得更多内容)
第一步:备份你的 WordPress
你的 WordPress 将会在创建站点网络时升级,请于操作前备份你的数据。
第二步:设置子域名
(如果选择子目录方式安装,请跳过此步骤。)
Sub-domain sites work with the use of wildcard subdomains. This is a two-step process:
- Apache 必须设置为支持通配符。
- Open up the
httpd.conffile or the include file containing the VHOST entry for your web account. - 添加此行:
ServerAlias *.example.com
- Open up the
- 在DNS解析中添加一行带有通配符的子域名解析记录:
A *.example.com
If you can't access httpd.conf and your server uses CPanel. Make a sub-domain named "*" (wildcard) at your CPanel (*.example.com). Don't give names to subdomains at CPanel. If you can't do that, contact your host.
如果你的服务器使用 Plesk Panel 控制面板. There are several steps that differ when setting up the server for wildcard subdomains on a server using Plesk Panel compared to a server using cPanel (or no control panel). This article Configuring Wildcard Subdomains for multi site under Plesk Control Panel details all the steps involved. Although the instructions are comprehensive, the actual work only takes a couple of minutes.
如果你的服务器使用 DirectAdmin 控制面板。 (2011.01)
- 点击 "User Panel" -> DNS Management -> 添加下面三项:* A 123.45.67.890(将“123.45.67.890”替换为你服务器的IP)
- 单击 "Admin Panel" (如果你没有 "admin panel" 选项,你需要让你的空间提供商做这件事) -> 自定义 Httpd -> yourdomain.com -> 在文本框中粘贴并保存此行:ServerAlias *.|DOMAIN|(如果你需要撤销此操作,返回该行,删除文本框中的文本并保存)
External links:
- Wildcard DNS record (Wikipedia)
- Apache Virtual Host (Apache HTTP Server documentation)
- DirectAdmin.com: Apache Wildcard Documentation... DirectAdmin.com forum: Wordpress wildcard subdomains.
第三步:开启多站点功能
To enable the Network menu item, you must first define multisite in the wp-config.php file.
打开 wp-config.php 并且 在/* That's all, stop editing! Happy blogging. */的上方加入此行:
define('WP_ALLOW_MULTISITE', true);
第四步:安装站点网络
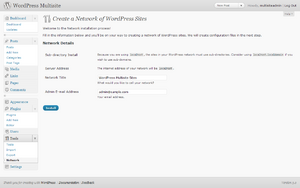
This will enable the Network menu item to appear in the Tools menu. Visit Administration > Tools > Network to see the screen where you will configure certain aspects of our network.
- Addresses of Sites in your Network
- You are given the choice between sub-domains or sub-directories (if none of the above applies). This means each additional site in your network will be created as a new virtual subdomain or subdirectory. you have to pick one or the other, and you cannot change this unless you reconfigure your install. See also Before You Begin.
- Sub-domains -- like
site1.example.comandsite2.example.com - Sub-directories -- like
example.com/site1andexample.com/site2
- Sub-domains -- like
- Network Details
- There are filled in automatically.
- Server Address
- The Internet address of your network will be
example.com. - Network Title
- What would you like to call your network?
- Admin E-mail Address
- Your email address.
Double-check they are correct and click the Install button.
You may receive a warning about wildcard subdomains. Check Setting Wildcard Subdomains.
Warning! Wildcard DNS may not be configured correctly!
The installer attempted to contact a random hostname (13cc09.example.com) on your domain.
To use a subdomain configuration, you must have a wildcard entry in your DNS. This usually means adding a * hostname record pointing at your web server in your DNS configuration tool.
You can still use your site but any subdomain you create may not be accessible. If you know your DNS is correct, ignore this message.
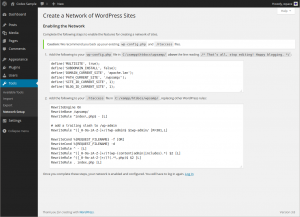
第五步:启用站点网络
The rest of the steps are ones you must complete in order to finish.
- 0. 首先, 备份网站根目录上的
wp-config.php和.htaccess文件。
- 1. 在
/wp-content/目录下创建一个blogs.dir文件 - 这个目录是用来存储其他站点上传的多媒体文件的,必须在服务器上授予可写权限,就像
wp-content目录一样授予CHOWNed和CHMODed权限。
- 2. Add the extra lines your WordPress installation generates into your
wp-config.phpfile. - These lines are dynamically generated for you based on your configuration.
- Edit the
wp-config.phpfile while you are logged in to your sites admin panel. - Paste the generated lines immediately above
/* That's all, stop editing! Happy blogging. */. - Remove the earlier placed
define('WP_ALLOW_MULTISITE', true);line only if you wish to remove the Network menu in the admin area. You may choose to leave this to be able to access the .htaccess rules again..
- 3. Add the generated mod_rewrite rules to your
.htaccessfile, replacing other WordPress rules. - (If there isn't one, then create it.)
- These lines are dynamically generated for you based on your configuration.
- 4. Log in again.
- Once the above steps are completed and the new wp-config.php & .htaccess files are saved, your network is enabled and configured. You will have to log in again. click "Log In" to refresh your Adminstration Panel. If you have problems logging back in, please clear your browser's cache and cookies.
第六步:超级管理员设置
You will now see a new menu section called Super Admin. The menus contained in there are for adding and managing additional sites in your network. Your base WordPress install is now the main site in your network.
Go Super Admin > Options panel to configure network options, and then create sites and users.
你需要知道的
Here are some additional things you might need to know about advanced administration of the blog network.
用户数据
By design, all users who are added to your network will have subscriber access to all sites on your network.
Also, site admins cannot install new themes or plugins. Only the Network Admin (aka Super Admin) has that ability.
永久链接
While permalinks will continue to work, the main blog (i.e. the first one created) will have an extra entry of blog, making your URLs appear like domain.com/blog/YYYY/MM/POSTNAME.
This is by design, in order to prevent collisions with SubFolder installs. Currently there is no easy way to change it, as doing so prevents WordPress from auto-detecting collisions between your main site and any subsites. This will be addressed, and customizable, in a future version of WordPress.
Also note that the blog prefix is not used for static pages which will be accessible directly under the base address, e.g. domain.com/PAGENAME. If you try to create a static page in the first blog with the name of another existing blog, the page's permalink will get a suffix (e.g. domain.com/PAGENAME-2). If you create a new blog with the slug of an existing static page, the static page will not be reachable anymore. To prevent this, you can add the names of your static pages to the blacklist so that no blog with this name can be created.
WordPress 插件
- WordPress的插件现在有更多的灵活性,这取决于它们在网络中的实现。
- 网站特定插件: WordPress的插件被激活或由个人博客的主人停用存储在<插件 目录. 你需要启用个人站点插件功能,超级管理员>站点网络>选项.
- 站点网络插件: WordPress插件存储在插件的目录由超级管理员在站点网络上激活。
- 必用插件: 对整个网络上的所有网站使用的插件,也可以安装在 MU-插件的目录作为单独的文件或者文件,包括子文件夹。在文件夹中的所有文件将不会被读取。这些文件没有被激活或停用;如果存在的话,它们被使用。
目录和标签
- Global terms are disabled in WordPress 3.0 by default. You can use the Sitewide Tags WordPress Plugin or other similar Plugins to incorporate global tags on the portal/front page of the site or on specific pages or blogs within the network to increase navigation based upon micro-categorized content.
在子域名和子目录之间选择
If you have had WordPress installed for longer than a month and are attempting to activate the network, you will be told to use Sub-domain sites. This is in order to ensure you don't have conflicts between pages (i.e. example.com/pagename ) and sites (i.e. example.com/sitename ). If you are confident you will not have this issue, then you can change this after you finish the initial setup.
In your wp-config.php file, you'll want to change the define call for SUBDOMAIN_INSTALL:
- Use SubDomains
define( 'SUBDOMAIN_INSTALL', true );
- Use SubFolders
define( 'SUBDOMAIN_INSTALL', false );
You'll also have to change your .htaccess to the new setup. Be aware, you may have issues if you attempt this after being on one setup or the other for any length of time, so proceed with caution.
.htaccess 和 Mod Rewrite
Unlike Single Site WordPress, which can work with "ugly" Permalinks and thus does not need Mod Rewrite, MultiSite requires its use to format URLs for your subsites. This necessitates the use of an .htaccess file, the format of which will be slightly different if you're using SubFolders or SubDomains. The examples below are the standard .htaccess entries for WordPress SubFolders and SubDomains, when WordPress is installed in the root folder of your website. If you have WordPress in it's own folder, you will need to change the value for RewriteBase appropriately.
需要提醒的是,这里有一些示例可以应用到大多数情境中,但不是全部。
子目录示例
# 开始 WordPress
RewriteEngine On
RewriteBase /
RewriteRule ^index\.php$ - [L]

# 上传文件
RewriteRule ^([_0-9a-zA-Z-]+/)?files/(.+) wp-includes/ms-files.php?file=$2 [L]

# 为 /wp-admin 加上一个斜杠
RewriteRule ^([_0-9a-zA-Z-]+/)?wp-admin$ $1wp-admin/ [R=301,L]

RewriteCond %{REQUEST_FILENAME} -f [OR]
RewriteCond %{REQUEST_FILENAME} -d
RewriteRule ^ - [L]
RewriteRule  ^[_0-9a-zA-Z-]+/(wp-(content|admin|includes).*) $1 [L]
RewriteRule  ^[_0-9a-zA-Z-]+/(.*\.php)$ $1 [L]
RewriteRule . index.php [L]
# 结束 WordPress
子域名示例
# 开始 WordPress
RewriteEngine On
RewriteBase /
RewriteRule ^index\.php$ - [L]

# 文件上传
RewriteRule ^files/(.+) wp-includes/ms-files.php?file=$1 [L]

RewriteCond %{REQUEST_FILENAME} -f [OR]
RewriteCond %{REQUEST_FILENAME} -d
RewriteRule ^ - [L]
RewriteRule . index.php [L]
# 结束 WordPress

