Getting Started
This section provides step by step documentation, with accompanying videos and graphics, regarding how to manage your website using WordPress. It is written for non-developers who are absolutely new to Wordpress. Developers should refer to this page for technical documentation.
If you do not find the answer to your question(s) here, you should post it in the WordPress Support Forum or speak with the developer (or development team) you hired to deploy your website. They may contribute your question and the answer to this codex.
Lastly, be sure to familiarize yourself with a few of the important glossary terms before continuing.
Contents
Step by Step Instructions
By the end of these instructions, you will be trained to add, remove and modify pages, posts, users and related media.
Login
To log in, select the "Log In" link on the front end of your website. If you're unable to locate this link append /wp-admin to your website's URL as in the following example: www.MySite.com/wp-admin
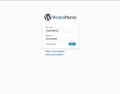
Login Screen

Enter the username and password provided to you by the developer, or development team, you hired to deploy your website. If you know your username but have forgotten your password simply select the "Lost your password?" link on the log in page and follow the instructions it provides.
Review the Dashboard
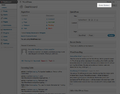
The "Dashboard" is the first page you come to upon logging in. Essentially, it is an overview of all of the activity on your website. Though it may not be especially beneficial to you as a new user, over time its purpose and usefulness will become clearer.
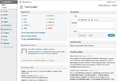
The Dashboard

WordPress emphasizes a separation between tools for developers and tools for non-developers. To accomplish this you can collapse and re-arrange the panels on any Wordpress page by simply selecting the title, or selecting and dragging the panel to a new location.
Collapsing Panels
Reorganizing Panels


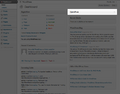
Additionally, you can select the "Screen Options" tab in the upper right of your screen to completely hide panels that are confusing or irrelevant to you and your needs. There is also a "Help" tab you can select which provides useful information that is contextual to the section of WordPress that you are in.
Screen Options Button
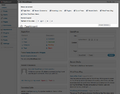
Screen Options Button Expanded


On the left of the screen will be a panel of buttons that link to the various sections of Wordpress. This is called your "WordPress navigation", not to be mistaken with your "website's navigation" which is accessible to those visiting your website on the front end. These will be individually explained later on, but it's important for you to know where this panel of buttons is located.
WordPress Navigation

If still you're unsure of how you can put the Dashboard to use, read on for now and revisit this later and it may make more sense.
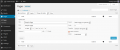
Review the Pages Section
The first thing most new users want to know how to do is add, remove or edit pages. Because some developers customize their users editing experience, you may want to check with the developer, or development team, you hired to ask them "What areas are editable on my website?".
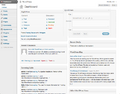
By navigating to the "Pages" section, located in the WordPress navigation, you'll come to a page that lists all of the pages that exist within your website. Some developers populate this with pages and content you have requested, or with content they feel is important to have there, but you should see at least one page listed either way.
If you move your mouse over the title of a page, several "quick options" will become available for you to selection. Note that these options are also accessible from other area's of the Page's section, and these are intended to be a sort of short cut to streamline your time while editing.
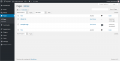
Pages
Quick Edit Page


How do I add a page?
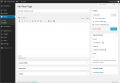
To add a new page, select the "Add New" button from beneath the "Pages" panel in the WordPress navigation, or from the button beside the "Pages" title towards the upper left of the screen. This will reload the page and take you to the editor section.
Add New
Edit Page
Edit Page Full Screen


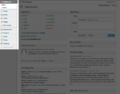
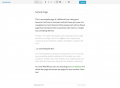
You may enter your title in the first field, which should have text that says "Enter title here". Below that is the main content area, here forth referred to as the "Visual Editor".
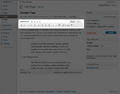
Standard Visual Editor

Here you may enter the whatever content you like into this section. You'll notice formatting options that are found in similar writing applications such as Apple's iWork, Google's Documents and Microsoft's Office.
How do I save?
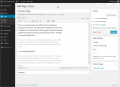
There is a large blue button, usually saying "Update" or "Publish", in the upper right of the window within the "Publish" panel. Select this and your changes will be saved and published.
How do I insert an image, video, audio clip or other file such as a PDF?
There are four icons you should know about that aren't always found in other common word processing applications. They are the insert image, video, audio and other media icons. They appear immediately above the visual editor and sometimes appear alongside all of the other buttons within the visual editor. If you hover your mouse over each icon, after a few seconds, a title will appear telling you what each icon represents (image, video, etc...)
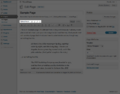
File Upload Icons
- To insert an image, place your cursor beside the text you want it to appear beside (we will choose its alignment in a moment).
- Select the image icon and you'll be prompted with a new window. This window has three tabs along the top: "From Computer", "From URL" and "Media Library". By default, it is selected on "From Computer" and gives you the option to "Select Files".
- Choose "Select Files" and you will receive another prompt to choose an image from your computer. Do so and select "Open", "Upload" or whatever the dialog may be.
- Your image will begin to upload and you may see an animated progress bar representing its progress. If the image is too large, you will be notified. If you consistently find yourself unable to upload images you may need to contact the developer, or development team, you hired for your project to increase the size limit.
- Upon successfully uploading an image the first prompt window will slide down to display new information about the image. You may populate that information to your liking, such as selecting the alignment and size, but these are optional settings. Once you have adjusted these accordingly, you should select the "Insert Into Post" button. If you do not see this as an option, you may need to scroll down in the window.
At this point, you should see the image inserted into your page where you had previous placed your cursor. Of course, if you adjusted the alignment it may be in a different location approximate to where the cursor was.
How do I crop or resize an image?
- Once you have uploaded an image, there will be a button that says "Edit Image" immediately beneath the thumbnail, select this.
- From there you can drag your cursor across the image to crop it to your liking. You'll notice the height and width of the image (in pixels) will be added to the "aspect ratio" boxes.
- When you're done, select the "Crop" tool, which is the first icon in the upper left section of that window.
- It will crop your photo according to your markings, if it's acceptable you can simply select the "Save" button that appears in the editor and use the photo how you wish.
To insert videos, audio clips and other files (such as PDF's) you may select the related icon and you'll be given similar prompts.
Quick Tip: If the visual editor is too small, you can resize it by selecting the lower right corner of it and dragging it down and to the right.
Review the Posts Section
This section is currently under development.
Review the Users Section
How do I add a user?
From the navigation, select "Users". The page will reload and you will see a list of any existing users. From the navigation, again, beneath "Users" select "Add New".
Glossary Terms
The following are some terms that we feel are important for every new users of WordPress to know.