bn:একটি নেটওয়ার্ক তৈরি করুন
Languages: বাংলা • English • Français • A Network 日本語 Português do Brasil • Русский • 中文(简体) • Español • (Add your language)
ওয়ার্ডপ্রেস ৩.০ থেকে আপনি মাল্টিসাইট ফিচার ব্যবহার করে একটি নেটওয়ার্ক তৈরি করতে পারেন। এই আর্টিকেল থেকে মাল্টিসাইট নেটওয়ার্ক তৈরি করার দিক নির্দেশনা পাবেন।
একটি মাল্টিসাইট নেটওয়ার্ক অনেকটা WordPress.com এর আপনার ব্যক্তিগত ভার্সনের মত। আপনার নেটওয়ার্কের ব্যবহারকারীরা চাইলে প্রয়োজন অনুযায়ী তাদের নিজেদের সাইট তৈরি করতে পারেন, ঠিক যেমন ব্যবহারকারীরা WordPress.com এ নিজেদের ব্লগ তৈরি করতে পারেন। যদি আপনি সাধারন ব্যবহারকারীদের নিজেদের প্রয়োজনমত সাইট বানাতে দিতে না চান তবে আপনি এমন একটি মাল্টিসাইট নেটওয়ার্ক তৈরি করতে পারেন যেখানে শুধুমাত্র আপনি, অর্থাৎ এডমিনিস্ট্রেটর নতুন সাইট যোগ করতে পারবেন।
একটি মাল্টিসাইট নেটওয়ার্ক কয়েকটি সাইটের সমষ্টি যেগুলো সবাই একই ওয়ার্ডপ্রেস ইন্সটলেশন ব্যবহার করে। এমনকি তারা থিম এবং প্লাগিন ও শেয়ার করতে পারে। নেটওয়ার্কের অধীনস্ত প্রতিটি সাইট অনেকটা ভার্চুয়াল সাইটের মত, যেহেতু তাদের নিজেদের নামে কোন ডিরেক্টরি থাকে না সার্ভারে। যদিও তাদের জন্য আলাদা আপলোড ডিরেক্টরি থাকে এবং ডাটাবেইজে আলাদা টেবিল থাকে।
ধাপ ০: শুরু করার আগে
Contents
সাধারন ওয়ার্ডপ্রেস এর সাথে তুলনা করলে নেটওয়ার্ক ইন্সটলেশন এ কিছু অতিরিক্ত বিষয় খেয়াল করতে হয়। আপনাকে অবশ্যই সিদ্ধান্ত নিতে হবে যে আপনি কি সাবডোমেইন ব্যবহার করবেন নাকি সাবফোল্ডার ব্যবহার করবেন এবং আপনি কিভাবে সেগুলো নিয়ন্ত্রন করতে চান। থিম এবং প্লাগিন এর ইন্সটলেশন প্রক্রিয়া ভিন্নঃ উদাহরণ স্বরূপ, একটি নেটওয়ার্কের অধীনে প্রতিটি আলাদা সাইট সব প্লাগিন বা থিম সক্রিয় করতে পারবে কিন্তু ইন্সটল করতে পারবে না।
এই গাইড দেখাবে কিভাবে আপনার বর্তমান ওয়ার্ডপ্রেস ইন্সটলেশনে মাল্টিসাইট ইন্সটল করবেন। এছাড়াও বিটনামি এর থেকে আছে ঃ ready-to-run packages
অনুগ্রহ করে নেটওয়ার্ক তৈরি করার আগে অবশ্যই পূরো আর্টিকেলটি পড়ে নিন ঃ Before You Create A Network
ধাপ ১: আপনার ওয়ার্ডপ্রেস তৈরি করুন
নেটওয়ার্ক তৈরি করার সময় আপনার বিদ্যমান ওয়ার্ডপ্রেস সাইট হালনাগাদ হবে। যদি এটি সম্পূর্ন খালি ইন্সটলেশন হয় এবং হারানোর মত কিছু না থাকে তাহলে এগিয়ে যান, অন্যথায় অর্থাৎ পুরনো ইন্সটলেশন হলে অবশ্যই ফাইল এবং ডাটাবেজ এর ব্যাকআপ নিয়ে নিন।
ওয়ার্ডপ্রেস এর সিঙ্গেল ইন্সটলেশনে প্রেটি পার্মালিঙ্কস কাজ করে কিনা দেখে নিন।
সব সক্রিয় প্লাগিনকে নিষ্ক্রিয় করুন, নেটওয়ার্ক তৈরি হবার পর আপনি আবার সক্রিয় করতে পারবেন।
আপনি যদি ওয়ার্ডপ্রেস কে তার নিজ ডিরেক্টরির বাইরে রাখতে চান , তবে অবশ্যই সেটা মাল্টিসাইট সক্রিয় করার আগে করুন।
ধাপ ২: মাল্টিসাইটের অনুমতি দিন
নেটওয়ার্ক সেটাপ মেনু আইটেম সক্রিয় করার জন্য প্রথমে আপনাকে অবশ্যই wp-config.php ফাইলে মাল্টিসাইট ঘোষনা (define) করতে হবে।
wp-config.php ফাইলটি ওপেন করুন এবং নিচের লাইনটি যোগ করুন ঠিক যেখানে /* That's all, stop editing! Happy blogging. */ আছে তার উপরে। যদি এই লাইনটি কোথাও না থাকে, তবে require অথবা include শুরু হওয়ার আগে যেকোন জায়গায় দিন।
/* Multisite */
define( 'WP_ALLOW_MULTISITE', true );
ব্রাউজার রিফ্রেশ করুন পরবর্তী ধাপের জন্য।
ধাপ ৩: একটি নেটওয়ার্ক ইনস্টল করা
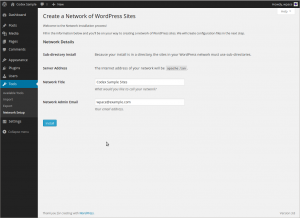
আগের ধাপ টুলস মেনুর অধীনে নেটওয়ার্ক মেনু যোগ করে। সেই মেনু আইটেম ব্যবহার করে Create a Network of WordPress Sites স্ক্রীনে যান।
To see an example of the Create a Network of WordPress Sites screen, look at Administration > Tools > Network Setup. The screen does not look exactly the same in all circumstances. The example shown is for an installation on localhost, which restricts the options available.
Addresses of Sites in your Network
You are given the choice between sub-domains and sub-directories, except when existing settings restrict your choice.
You must choose one or the other. You can reconfigure your network to use the other choice after installation, despite the advice on the screen, but reconfiguring it might not be easy.
You only need wildcard DNS for on-demand domain-based sites, despite the advice that may be on the screen.
Once more: See Before You Create A Network.
- Sub-domains — a domain-based network in which on-demand sites use subdomains
- Sub-directories — a path-based network in which on-demand sites use paths
Network Details
These are filled in automatically, but you can make changes.
- Server Address
- The domain of the URL you are using to access your WordPress installation.
- Network Title
- The title of your network as a whole.
- Admin E-mail Address
- Your email address as super admin of the network as a whole.
Double-check the details and press the Install button.
Note: The installer may perform a check for wildcard subdomains when you have not configured them yet, or when you do not need them at all. Ignore the warning if it does not apply to your network. See the Server Requirements section in Before You Create A Network for information about wildcard subdomains.
ধাপ ৪: নেটওয়ার্ক সক্রিয় করা
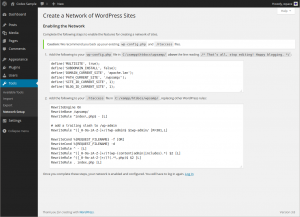
To enable your network, follow the instructions on the Create a Network of WordPress Sites screen. The instructions that you see are customized for your installation. They might not be the same as the examples you see here.
Back up your existing wp-config.php and .htaccess files, unless this is a fresh install and you have nothing to lose.
There are two steps:
- 1. Add the specified lines to your
wp-config.phpfile - The extra lines go just after where you added the line in Step 1: Prepare Your WordPress.
- 2. Add the specified lines to your
.htaccessfile - If you do not have a
.htaccessfile, then create it in the same directory as yourwp-config.phpfile. - If you ALREADY have a
.htaccessfile, replace any existing WP lines with these new ones. - In some cases you might also have to add Options FollowSymlinks at the start of the file.
After completing these steps, log in again using the link provided. You might have to clear your browser's cache and cookies in order to log in.
ধাপ ৫: নেটওয়ার্ক অ্যাডমিন সেটিংস
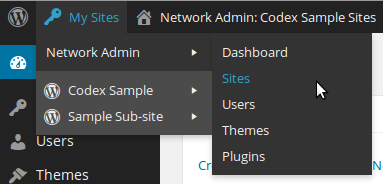
At the left of your WordPress toolbar, My Sites is now the second item. There, all your sites are listed, with handy fly-out menus, as well as a Network Admin menu item. Under Network Admin you can use the Dashboard item to go to the Network Dashboard screen.
Go to the Settings Screen to configure network options, and the Sites Screen to manage your sites.
আরো তথ্যের জন্য দেখুন : Network Admin
![]() আপগ্রেড করেছেন কিন্তু নেটওয়ার্ক এডমিন মেনু পাচ্ছেন না?
আপগ্রেড করেছেন কিন্তু নেটওয়ার্ক এডমিন মেনু পাচ্ছেন না?
ধাপ ৬: পরিচালনা
There are some additional things you might need to know about advanced administration of the network, due to the additional complexity of a Multisite. Even if you're familiar with WordPress, the location and behavior of Multisite Network Administration can be confusing.
Read Multisite Network Administration for more information.
For help troubleshooting:


