zh-cn:工具 网络页面
Languages: English • Português do Brasil • 中文(简体) • (Add your language)
Contents
工具 → 网络
在 WordPress 3.0 之后,您可以创建拥有多个站点的站点网络。要启用“网络”功能,您需要先在 wp-config.php 文件中定义 multisite(多站点)。请注意,需要您手动编辑文件的原因是,正确使用“网络”功能需要用户拥有一定的专业程度。为此,开发者特意添加了手工配置 wp-config.php 的环节。
创建 WordPress 站点网络
To start the process of creating a Network, you first must tell WordPress to allow multisites, and by doing do enable the Network menu item to appear in the Tools menu. It is there you will configure certain aspects of your network. So first, edit the wp-config.php file and add the following line to the file:
define('WP_ALLOW_MULTISITE', true);
- Considerations
- Giving WordPress Its Own Directory will not work in WordPress 3.0 with multisite enabled. It interferes with the member blog lookup.
- You cannot create a network in the following cases:
- "WordPress address (URL)" is different from "Site address (URL)"
- "WordPress address (URL)" is used IP address such as 127.0.0.1 or port number other than ':80', ':443'.
- Use 'localhost' instead of '127.0.0.1', if on local computer.
Addresses of Sites in your Network
The primary information in this section involves the decision to use sub-domains or sub-directories for your sites. This means each additional site in your network will be created as a new virtual sub-domain or sub-directory. Please choose whether you would like sites in your WordPress network to use sub-domains or sub-directories. You cannot change this later.
- Sub-domains
- Check this radio button to utilize sub-domains for your sites. Examples of sub-domains are site1.example.com and site2.example.com. This features works by using wildcard subdomains. You must have this enabled in Apache, and you must also add a wildcard sub-domain to your DNS records. Some hosts will not support this, so you may need to ask your host before enabling this feature.
- Sub-directories
- Check this radio button to utilize sub-directories for your sites. Examples of sub-directories are example.com/site1 and example.com/site2. Sub-directories work with mod_rewrite.
Note: If you wish to use fully qualified domains, you still need to pick a format to start with. Then after verifying they work, use the Domain Mapping plugin.
Alternative Messages
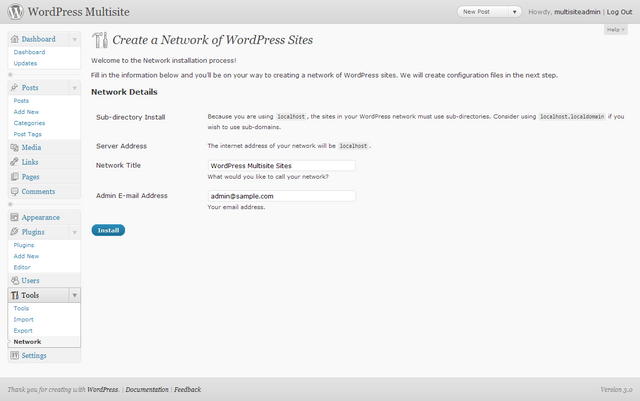
- Sub-domain Install
- This messages displays if you are changing from a stand-alone version of WordPress to the multisite version this will display.
- Because your install is not new, the sites in your WordPress network must use sub-domains. The main site in a sub-directory install will need to use a modified permalink structure, potentially breaking existing links.
- Sub-directory Install
- This messages displays if you are using localhost as a domain.
- Because you are using
localhost, the sites in your WordPress network must use sub-directories. Consider usinglocalhost.localdomainif you wish to use sub-domains.
Network Details
- Server Address
- The Internet address of your network will be
example.com. This information is filled in automatically. Note: if your existing URL has www such as www.example.com you will see this message: "We recommend you change your siteurl toexample.combefore enabling the network feature. It will still be possible to visit your site using thewwwprefix with an address likewww.sample.combut any links will not have thewwwprefix."
- Network Title
- What would you like to call your network? A suggested title is supplied but edit that to reflect the title you want to use.
- Admin E-mail Address
- Your email address. A suggested email is supplied, but change as necessary.
Install
Click the Install button to start the network install.
Installation Warnings
You may receive a warning about wildcard subdomains.
- To use a subdomain configuration, you must have a wildcard entry in your DNS. This usually means adding a * hostname record pointing at your web server in your DNS configuration tool.
- Warning! Wildcard DNS may not be configured correctly!
- The installer attempted to contact a random hostname (599af5.sample.com) on your domain. This resulted in an error message: Couldn't resolve host '599af5.sample.com'
- You can still use your site but any subdomain you create may not be accessible. If you know your DNS is correct, ignore this message.
Further instructions for enabling wildcard subdomains are available at wildcard subdomain instruction link to be determined.
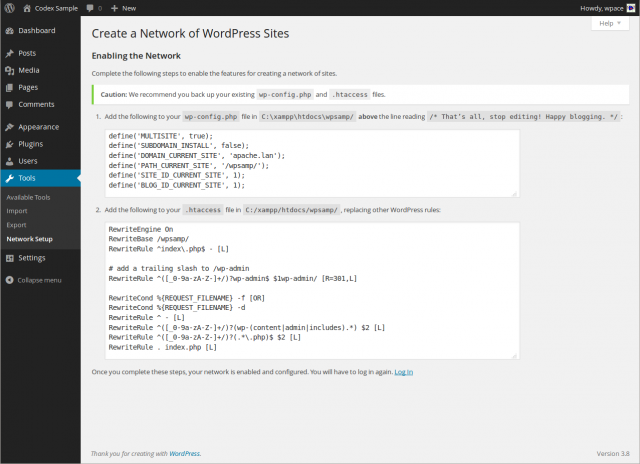
Enabling the Network
Once the Network install is completed this Screen displays with these directions. Follow the directions in the order presented to complete the process.
- Caution We recommend you back up your existing wp-config.php and .htaccess files.
- 1. Create a blogs.dir directory in /wp-content.
- This directory is used to stored uploaded media for your additional sites and must be writeable by the web server. Note that the directory should be CHOWNed and CHMODed the same as your wp-content folder.
- If you've set the WP_CONTENT_DIR constant to something other than wp-content you may want to reconsider as you will see this message:
- Warning: Networks may not be fully compatible with custom wp-content directories.
- 2. Add the following to your wp-config.php file in /public_html/ above the line reading /* That’s all, stop editing! Happy blogging. */
- These lines are automatically generated and will look similar to this.
- define( 'MULTISITE', true );
- define( 'SUBDOMAIN_INSTALL', true );
- $base = '/';
- define( 'DOMAIN_CURRENT_SITE', 'sample.com' );
- define( 'PATH_CURRENT_SITE', '/' );
- define( 'SITE_ID_CURRENT_SITE', 1 );
- define( 'BLOG_ID_CURRENT_SITE', 1 );
- These unique authentication keys are also missing from your wp-config.php file. To make your installation more secure, you should also add
- These lines are automatically generated and will look similar to this.
- define( 'AUTH_KEY', '{K 2rUF&u y(Ak0(M3J%f(W&ADLiI(+#^W*H|0@jdAc(0LHOz3)gaiOoDgN_;W+2' );
- define( 'SECURE_AUTH_KEY', ']n+=#}^=3BdTn~FoS@8K#o|~WgC@#?Oj*s[L+Y+tInaOjNCFa1h59vRL#!R[[{UI' );
- define( 'LOGGED_IN_KEY', 'hFe,fw?jgX@@X,Yl]jz9!qoD]v8N[TNDvleEaE5zH=|`D+yUYM|>/=8KRelv=XPE' );
- define( 'NONCE_KEY', 'fkrSg(v-|/&=TC{66rgrX[_VpWv$.{a{q$CvjvjB$AP<5q?|58{6xvN{xut r?|j' );
- define( 'AUTH_SALT', 'kVVt8^+oh,$|?g RxaWq_Px RwC%^^r?8zhQ+GDUWp:QB]W!tPHins]RJ@a%P_ue' );
- define( 'SECURE_AUTH_SALT', '>|tv)^94YuNk[:+)l<5ubJ0uTdo3gn9|YN.0J/MR1R>T=oe1}eov*ds@Z.&PA%&q' );
- define( 'LOGGED_IN_SALT', 'E,C#!<lf6B $y;-nfjP10$rea?g/_A,V0tkbqCNJMfOO)Ml4&JUhM]bU[*w]oh,X' );
- define( 'NONCE_SALT', '$qbgS^/Dj.RJC-,S<y9L7SV9EMuyB <wQS`}poc;Yd{PGa$!,b*oL<qX!cPMqXh`' );
- 3. Add the following to your .htaccess file in /public_html/sample.com/, replacing other WordPress rules
- If there isn't an .htaccess file, then create it. These lines are automatically generated and will look similar to this.
- RewriteEngine On
- RewriteBase /
- RewriteRule ^index\.php$ - [L]
- #uploaded files
- RewriteRule ^files/(.+) wp-includes/ms-files.php?file=$1 [L]
- RewriteCond %{REQUEST_FILENAME} -f [OR]
- RewriteCond %{REQUEST_FILENAME} -d
- RewriteRule ^ - [L]
- RewriteRule . index.php [L]
- Once you complete these steps, your network is enabled and configured. You will have to log in again
- Click the Log In link. You will now see a new menu section called Super Admin. The menus contained in there are for adding and managing additional sites in your network. Your base WordPress install is now the main site in your network.
Visit the Administration > Network Admin > Settings Screen to configure network options. After that you will need to create sites and users.
解决问题
- If after enabling networking/multisite and you are not able to login, try clearing your browser cache AND cookies, then try to login.

